Welcome to the HWS Tactics and Layout guide for PvP!
I’m your host and If you haven’t already, check out our SV, HV, and CV guides for information on how to make a decent pvp vessel for exploring these regions of the server.
In this guide, we’ll be covering the layout of the galaxy, how to navigate throughout HWS by using supergates, how to evade & escape enemies when you need to, and finally, vessel tactics.
Chapter 1. Layout
Subsection 1. Galactic Map.
The thing that’s always important to remember is that HWS rotates it’s map every single season. They also tend to make minor to moderate changes mid-season as well, meaning it’s extremely important to be familiar with the current layout. This particular section will cover how to interpret the HWS map, so that you can remain upto date.
With that being said, let’s take a look at the current map:
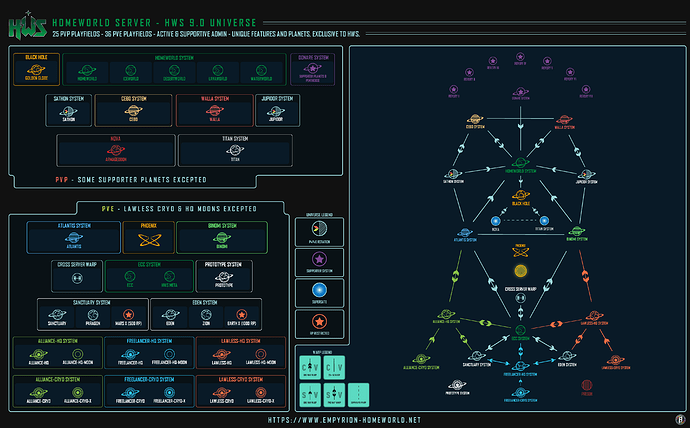
Note that you can always find the latest map here
The most noticeable thing about HWS’s map is that it isn’t an ingame render. This map details each system in a 2d plane with the left taken up mostly by map legends.
The top half of the left legend covers notable PVP planets while the bottom half covers notable PVE planets.
Warplanes are signified base on an arrow system. Two arrows in opposite directions mean two-directional travel. Only one arrow indicates one-way warping. What does this mean? Well, put simply, you can warp into the system, but you can only leave by using the HWS Supergate system (discussed in Chapter 2.
There’s also lines without arrows, this means two-way directional warp for CVs only. SV warpdrives won’t be able to travel the AU needed on these routes.
Note that CVs have a dedicated one way warp just like SVs with it being two closely compacted arrows, but this is not used in patch 9.0.
Now, systems marked with a dashed line on the right and a small arrow on the left are rotational systems. This means they change between PVE and PVP gameplay during the weekends and weekdays. You’ll need to look at the system details to find out the dates and times it changes. These are extremely good systems to experiment with PvP base designs.
Note that the donor systems up at the very top are for faction planets. These systems are accessible only by supergates. They are also on a PVPVE rotation.
Lets move onto subsection 2.
Subsection 2. Notable Locations.
Now that we know how to interpret the HWS 2D map, let’s go over notable locations for PVP players.
In no particular order:
Sathon. This system rotates between PVE and PVP, check the system info for dates. It’s notable because it’s one of the two systems connecting PVP to PVE by conventional warpdrive. It usually plays host to massive CV battles, as newer players warp in with workshop ships and veteran pvp players greet them with 70 thousand block dreadnoughts.
Jupidor. This is basically the same as Sathon. As one of the two systems that connect PVE with PVP, it’s often patrolled by large warships looking for an easy workshop kill.
Cebo. This system is notable for it’s NPC trader, which buys certain commodities, which, if played right, net a high profit margin. Billions are made from this system, and so it’s often locked down by the current superpower of the server. Be wary of beacons placed in the Points of Interest which when approached alert the faction who controls them that someone is nearby.
Walla. This system is pretty much the same as Cebo, it’s got an NPC trader on it that people love to trade things to. Again, watch out for beacons (discussed in chapter 3).
Homeworld. This is the entry point for the hardcore PVP sector. It’s one of the main hubs of PVP and is currently home to the event planet also named “Homeworld” What’s special about this planet is that the crust is made out of each type of material in the game.
As of writing this, homeworld can be locked by PVP players by doing an event in which you take control of a POI, which, upon event closure, locks the planet for 17 hours from the rest of the server, except for the group that controls it. Excellent for bringing in bulk resources for manual blueprint spawning.
Blackhole. Once you enter Blackhole, the only means of exit are super gates (Changing in patch 9.3 or season 9.3). Blackhole itself is host to Golden Globe, the seat of power in HWS PVP. The group that controls it, controls the main wealth of the server. It’s the single most important and most fought over planet. Consider it your primary objective when attempting to obtain PVP.
Be warned, factions that control it are often numbered in the tens or even the hundreds of players. Please note, blackhole does have two supergates for escape, but please read over chapter 2 before attempting to use them to escape.
Blackhole orbit wipes ever 24 hours, leaving only stealthed structures and and things on Golden Globe remaining.
Donare System This isn’t really a PVP system but it’s important to mention because it’s the donator planet hub. Any faction that is going to seriously contest PVP space has a planet here, and it’s linked directly into homeworld by supergate. It’s orbit is PVP on rotation, and each donor planet has a supergate with a unique number. Factions try very hard to hide this number, as enemies can use it to instantly chase down a retreating force into donare space.
Chapter 2. Navigation & Evasion.
Subsection 1. Supergates.
Supergates are an HWS unique feature which are the only means of escape from the Blackhole system. They are often the exit points for PVP and are also used for quick travel between ECC and PVP/donare space.
A supergate looks like this:
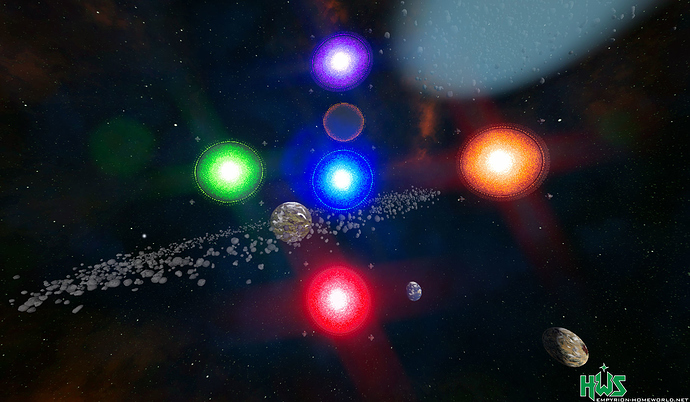
And, as you can see, comes in multiple colors. These colors signal their main purpose.
Please note, some gates are not marked, you can find the color coding and their coordinates here
But for our purposes we are going to mention two:
Blue Gates. These gates can freely warp between eachother. These are placed all over the PVP universe and will be your primary means of transportation.
Orange Gates. These gates have one sole purpose: Transportation between Donare and the rest of the HWS universe. Homeworld is the only exception here, because it’s blue gates are able to teleport to donare. You’ll find these colored gates in ECC and around the Donare space.
Supergates operate quite simply, you get within 3 Kilometers of the gate structure itself, open up faction chat with the , key and type sg:? which will bring up the list of gates that particular one is linked to. Once you establish what the full command is, you write it in, and boom, you’re instantly teleported to the other side!
Here’s an example, say I want to get to golden globe from homeworld, (I could warp, but say i didn’t) I simply go up to the blue gate in the homeworld system and type sg:warp:bh into faction chat.
Now, be careful not to type anything in global, as players will be able to determine where you are going, and it won’t work anyways!
Also of note: If you have an enemy nearby, you will be unable to use the supergate to transport out. No escape during combat! Make sure you shake your enemies before using the gate. See subsection 2 for info.
Now, there are two types of gates in primary PvP space, CV gates and SV gates.
CV gates accept all vessels, but protect against bases within their turret range.
SV gates will attack CVs and bases but will leave SVs well alone, again protecting the gate within their turret range. An excellent option if you’re an SV being chased by a CV.
We’ll discuss the usage of these two types in subsection 2!
Check the supergate types and their coordinates here (same link as above)
Note that you can always find the latest map, which will display locations of supergates here
Subsection 2. Evading Players.
Avoiding players
The first thing i’ll discuss is avoiding players in the first place. Every player in PvP flies around in a ship, CV or SV, which is rendered before their tags show (Their navigation beacons, red markers, etc) This is critical for our purposes. We can spot players visually before we get a marker, and if you’re in a mostly black ship, they are unlikely to see you on the backdrop. For SVs this is especially true, as CVs are larger and thus easily spotted.
This usually happens at around 1.15km from the target, and can be noticed by a slight “blue splash” sort of similar to a ship warp-in that happens when the ship loads in.
Tags show up on the minimap, as well as on your hud, so keeping your enemy in visual range only gives you a decisive advantage in avoiding them. Once you enter a system, immediately start scanning your surroundings for any signs of players, and at all costs, avoid the obvious areas to start with! Orbital rings, straight beeline to the planet, points of interest, etc. If you need to enter into one of these areas, visually scan it first for any signs of players and slowly move in, keeping careful watch on obvious locations players would be.
Now, once you have spotted a player, don’t move towards them for a closer look, because you only have a very limited window before your marker shows up. Instead, move to a blind spot, like the back of their ship up high or low, most people won’t frequently inspect those angles, preferring instead to check right, left, front, back. From this position, you can observe and wait until the player leaves the area.
Escaping from players
Let’s say you’ve already been spotted, you’re in marker range and they can clearly see you. Let’s also say you want to escape. What do you do?
Well, if you’re an SV:
If it’s a CV chasing you, you’re faster and can simply speed away. If, for some reason, this isn’t the case, make a headlong tactical retreat for the SV only supergate, and use it’s protective bubble to lose your attackers. Don’t stay there and expect to be able to warp out, as the enemy CV likely has SV support, instead, use the bubble to lose your attacker and immediately start to travel out in random directions. Wait until it’s calmer and then attempt to use a gate.
If it’s a SV, things get more complicated, because they can keep up with you. If you have a warpdrive on your SV, immediately use it to jump to another system, keep jumping after this point, as rapidly as you can in random directions. Eventually, you’ll lose them.
If you don’t have a warpdrive or you can’t shake that enemy, strap yourself in because you’re gonna be in it for the long haul. If you are within firing range of the enemy, dodge in-between other objects and change direction/speed to shake your opponent out of firing range, once you’ve achieved this, start heading out in any direction at maximum speed, your pursuer will now be following you just outside of weapon range.
Basically, you are going to keep heading out until you or your opponent die from starvation or boredom. Hopefully you came well prepared and have more rations then your enemy. Eventually, your attacker will be forced to withdraw, and you will be free to disengage.
If you don’t want to do this, then your only other option is to save the blueprint (die), which you can find out how to do in Chapter 3.
Now, if you’re a CV:
If it’s a CV that’s chasing you, warp out, if that isn’t possible because you’ve lost it, come to a full stop and quickly place one. If you don’t have one, craft one via the P menu while reversing away. Since you can’t enter the atmosphere there isn’t any way you’re going to escape without a warpdrive, since the enemy CV can simply chase you all the way to the gate. Once you warp out, do what you’d do for an SV, randomly warp out as rapidly as you can in all different directions.
If you STILL don’t have a warpdrive, my only suggestion to you is: Set turrets for turrets and strap in for a fight. If defeat is inevitable, look at chapter 3, for how to save the blueprint from capture.
If it’s a SV that’s chasing you, you’re in serious danger. As SVs are faster then CVs, they can easily outpace you and out-turn you. This means they might be able to find a blind-spot, tackle you (despite it being “illegal” Sidenote: Make sure you record every fight, in case anyone does this!) and force you to come to a full stop. From there, you’re at their mercy.
SVs usually don’t attack CVs unless they have backup close behind, hence the danger. If it is truly just one SV, you can deal with it by setting your CV turrets to fire only on SV mounted weapons, effectively nullifying the threat. We’ll proceed on the premise there’s a reason for this SV charging you.
So, immediately warp out, if that isn’t possible and you can’t replace the warpdrive, head to the nearest white orbital debris field. We’re looking for the nearest point of interest. Since you are a CV, you are more durable then an SV (If you followed the CV guide  ) and can tank more damage.
Head towards it and pass through it/past it. The SV usually won’t follow you, and if he does, he’ll regret it. Make a few more passes until he dies or pulls off. Try to minimize as much damage as you can. Try to get the SV to be the closer target to the turrets, so he’s prioritized.
Once you lose the SV, you should head out into the void and wait for things to cool down. The SV likely has CV friends camping the gate, so you’ll need to wait a couple of hours for everyone to get bored, and then slowly head to the gate.
Subsection 3. Navigation.
So, we’ve talked about supergates, avoiding players, where everything is, so we should be good to go right? Let’s start k-warping right? Wrong.
In PvP there are hundreds of players hunting for you and so you need to be careful when entering and exiting a system.
When you warp, you create a blue flash that can be seen throughout the sector, so for example, if you warp from homeworld to blackhole many pvp players will realize it’s likely because you’re going to golden globe, and since they know when you warp, and likely have the way-point preset, they are likely to “follow” you into the system. This is perfectly legal and often gets mistaken for warp-camping, which is not legal. Which is why you should immediately jump to a different system and then come back to your desired destination.
That’s because each warp-in point is in a different location for each system that it comes from, so by warping back, you can teleport across the sector and avoid the guy who just followed you. Of course, it’s possible they are going to try and follow you, but remember you set the way-point first and so likely have more time to get out of visual range before they find you.
That’s another thing you should do upon warp-in. Immediately start moving in a erratic, random direction at odd angles. Many players can guess that if you warped into black hole, and didn’t warp out, you’re likely heading straight from the warp-in point to the planet or other common areas. Once you’re about 5-10km out from your warp-in point, you can start heading towards your final destination.
When you warp, realize that it doesn’t matter what direction you’re traveling, so long as you are pointing at the way-point and going at 60m/s + you will be able to k-warp out. So turn off auto-brake and rotate your ship towards the warp point, that way you can execute faster warps.
Now, while your in any system, always have a way-point out pre-set. This is because if you spot a player and need to run, you can immediately rotate your ship (assuming your traveling at speed) and warp out.
With all that in mind, you are finally able to navigate safely in PvP 
Chapter 3. Common Tactics.
Subsection 1. Beacons.
In HWS there’s a system in place called Proximity Alert. What it does is if any enemy moves within 1km of a ship, an alert is sent to the entire faction that owns that ship. Or, if it’s set to private, just the player who owns the ship will be alerted.
So, in HWS players will often leave small cores around for you to run into, thus tripping the alarm and resulting in a response.
These beacons can be made out of anything, so long as it has a core, it’ll send your ship name and distance to the player that owns it or the faction that controls it.
The only requirement is that it has to be over 10 blocks, otherwise it’ll be deleted for being too small.
Common locations for beacons include NPC trader Points of Interest, asteroid rings, deposits, common player routes, and supergates.
Subsection 2. Preventing Blueprint Capture.
In some instances, it may become necessary to self destruct in order to “save” the blueprint from enemy capture. Here’s a few ways to do that:
- Run your ship directly into a point of interest. This ensures maximum destruction.
- Get out and start multi-tooling your sensitive areas. Start with the cockpit, knowing where a cockpit is located gives an advantage to your enemy. Start removing blocks out from there, until you are killed!
- Get shot down in the north or south pole. Since you can’t build, place, or blueprint in the poles due to game engine limitations, you can’t capture one either!
- Escape from battle and run the cb:destroy:id command, (where ID is your ship’s ID) this command requires you to be at least a kilometre out from an enemy before running it.
- egs:recycle:id. Like cb:destroy but you get the resources back! Make sure to have it at level 5 for in the field dismantling!
Subsection 3. General Combat Tactics.
In this section, we’ll cover some basic tips for ingame combat tactics when fighting against players for each vessel type. Most of these tactics will be exports from The Art of Warfare’s internal training program, so thanks to those guys for putting this together. (Disclaimer, Zackey_TNT (Me) is apart of TAW)
SV Tactics.
In SV design, all craft have a “primary axis” that we can take advantage of.
For example flat and wide craft make more use of the up and down axis (Pitch), and have worse turning on the side to side axis (Yaw).
So during combat, you should take advantage of this fact.
Example:
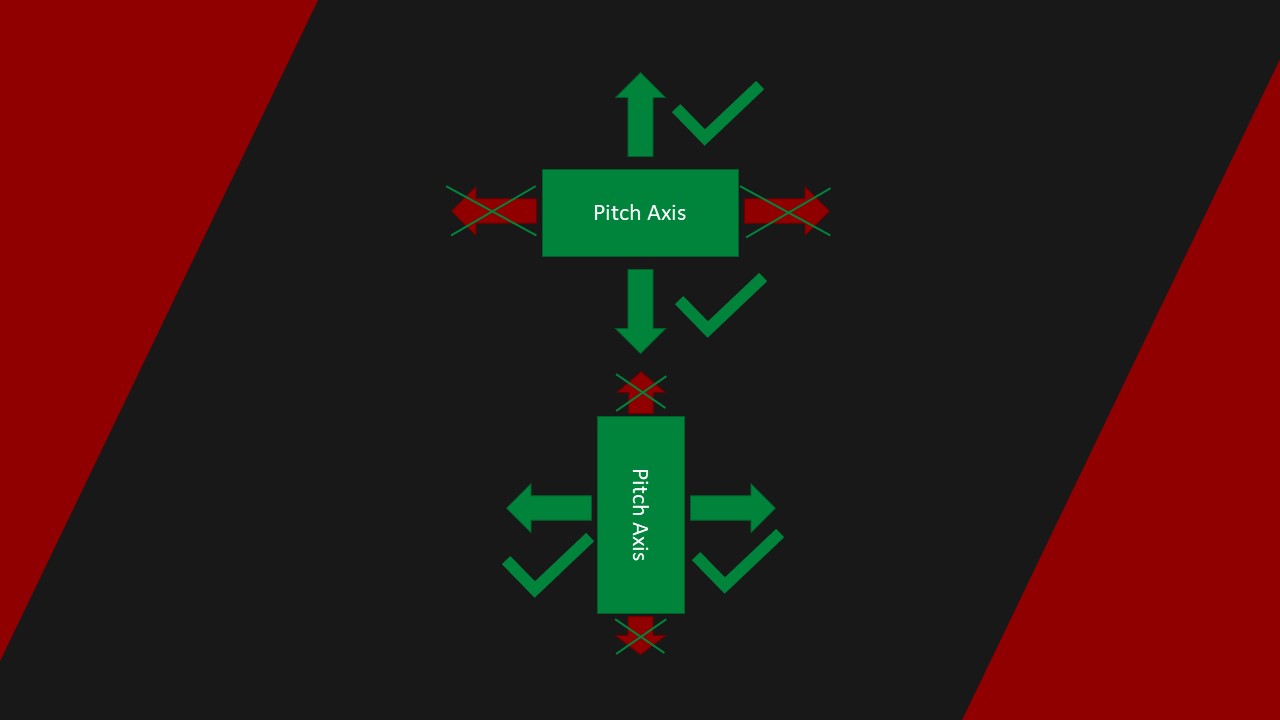
If we had more yaw, it’s just the reverse of this concept.
During combat, you may need to dodge enemy fire. The best way to do so is to use gravity to our advantage. Say we have 30m/s of base “Downforce” on our ship, if we assume a gravitation force of 1.78 (The gravity on GG) by simply pushing the down key, we gain an additional 17m/s of acceleration!
Example:
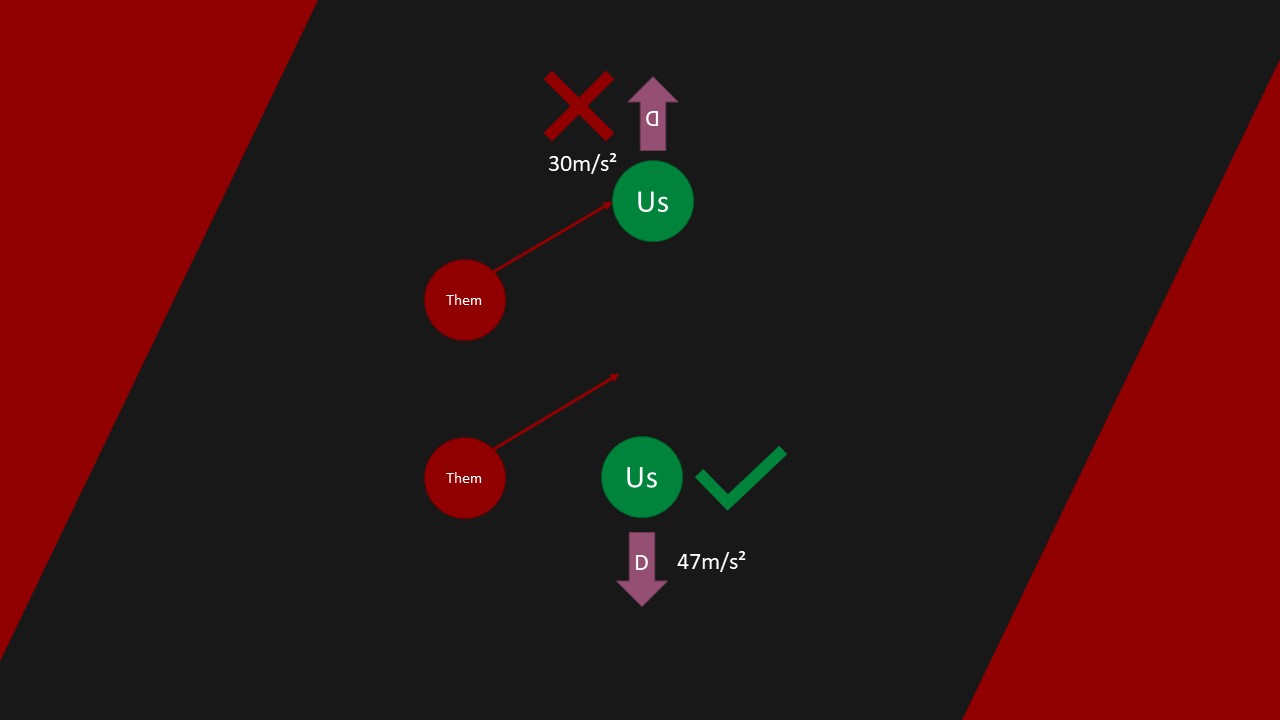
Asides from gravity, having the height advantage also exposes the top armor of enemy SVs, which is usually softer then frontal/underside armor.
It also makes projectiles more difficult to dodge, as they also gain gravitational acceleration.
Example:
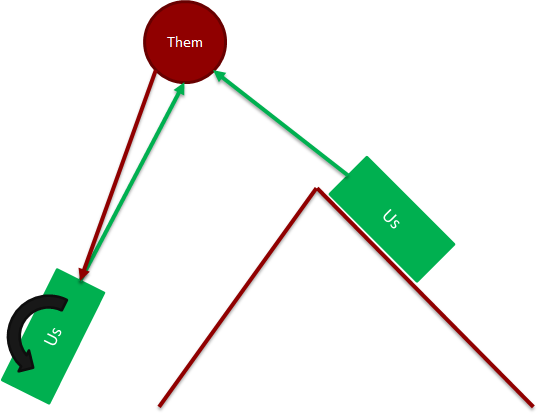
Reversing in the opposite direction of your opponent can give you an advantage.
This is called “S-keying” in which you kite an enemy away from cover while having the tactical advantage. Be warned, it makes people very salty!
If they chase you, they will be flying into your shots. Conversely, you will be flying away from their shots.
Sometimes you will need to “bait” the enemy into doing this by advancing and retreating. Eventually they will chase you.
If you combine this with advantages like gravity, height, and the primary axis, you can control the engagement.
Example:
When firing any type of weapon, it’s important to realize you are engaging long term, and need to hit the same spot multiple times to kill a target.
Weapon control is one of the hardest concepts to master in the heat of battle, but it’s one of the most important.
Don’t fire if you aren’t sure your going to hit.
Don’t fire if you will hit a part of the ship that won’t help you.
Example:
Always ammo your SVs evenly.
There should be at least one stack of each weapon ammo type in each box.
This prevents you from losing all of one (or more) type of ammunition when you lose a ammo box.
Here are the different pros & cons of each weapon system:
Pulse laser – Great for lag-shots and decent for stripping hull, uses lots of ammo.
Railgun – Great for system damage, slightly explosive, hard to hit with.
135mm Rocket – Great for hull stripping, easy to hit with, can’t deal with non hull blocks.
130mm Rocket – Good for bases, easily dodged.
Plasma – Good for ground targets, easily dodged.
Gatling - Only used for killing players, defeated by most armor.
HV Tactics.
When piloting an HV, it’s important to understand Hover-Engine
Hover-Engines are like magnets apposing each-other. They will “re-pulse” away from the terrain.
When approaching a rise, help the tank “Climb” it by pitching up, thus pushing the magnet further away from the terrain. Remember to set max height on your hovercraft! This will increase your ability to climb.
When reversing out of a ditch, push the nose of the tank down instead of pulling it up like on a hill.
Use the alt key to look backwards, so you don’t hit more terrain.
If you are still stuck on terrain, try repeatably switching between holding one of the arrow keys down and the “O” key.
Always keep moving and always point the tank straight at the target.
HVs rely on spreading damage around it’s frontal armor by constantly changing the angle of attack through movement. If it should become necessary to advance in the opposite direction, reverse using the S key, while looking backwards. This ensures you are still using your frontal armor and are still moving!
Another important factor in HV combat is the ability to catch shots.
By using pitch, we can “catch” shots from objects above our tank before they hit us.
This is done to prevent turrets from being damaged and because top armor is usually weaker then frontal armor.
Simply pull the mouse down and use the front of your tank like a baseball bat. Hit the projectiles with your frontal armor, and save yourself from extra damage!
HV vs HV:
When engaging an HV, target their turrets and generators.
You want to be working towards “Genning” them, while taking advantage of any shots you might get at their turrets.
If your outnumbered or fighting for survival, target turrets only, this will decrease their ability to damage you. Be warned, this often results in turret “trading” and can leave you defenseless!
Try to gain the height advantage.
Always try to get behind your target, 99% of the time enemy HVs will have their critical components on the back!
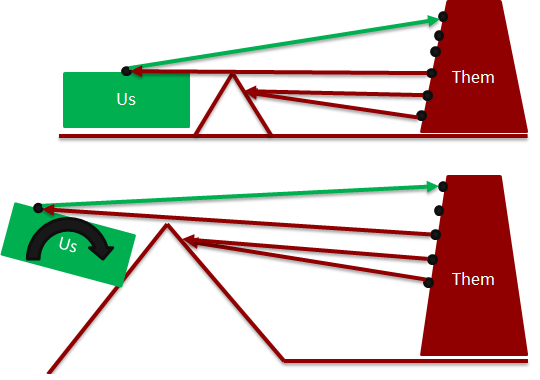
Use hills to your advantage!
By using large hills we are able to gain a height advantage against enemy targets.
This will allow us to hit their vulnerable top armor, unless they catch our shots. While at the same time requiring them to hit our frontal armor.
Decoys also become ineffective for the enemy, because their decoys will be further away then their turrets will be.
Example:
HV vs SV
When fighting an SV, target generators first. If you are out-numbered, target mounted weapons.
Realize that SVs can choose to disengage at any time. This means you might have a limited window of opportunity to shoot the target.
Also realize that HVs, given enough time, will kill an SVs 1v1, if you play them right due to their advantages (Block size, auto-aim)
Utilize mountains to reduce distance to the target.
Use pitch to raise your nose to the target.
Example:
HV vs BA
When engaging bases, target turrets. Try to use terrain to “peak” your turrets over a hill.
This means your important systems aren’t exposed.
Don’t rush a base unless in large numbers, HVs aren’t invincible!
If on a reverse slope, pull your nose down to expose the tops of your turrets.
Example:
Halo Dropping
Halo dropping is when you drop an HV off the deck of a CV from orbit. Since HVs can go forwards in space if they are completely level, it can be an effective means of getting an HV (or multiple) on planet!
When doing halo drops, the carrier must be completely level (O Key) and on the south-mid side of the planet. Once in position, face the hanger bay towards the planet and with the ship leveled out, get into the hv and tap the spacebar. This will undock you.
Next, hold down the W key until you reach the planet.
Do not hold the spacebar or any other key, as this will de-level you and cause your HV to immediately get stuck, which is unrecoverable!
CV Tactics.
CVs are relatively simple devices to crew. All they really require is ammo, fuel, and a pilot. Nevertheless, there are a few things to keep in mind.
Setup:
Before you enter any battle, make sure you have a set of replacement parts for all of your critical systems, such as a warp drive, a core, a cockpit, etc. Make sure your constructors have some materials for building these items as well.
Make sure your boxes are coded and set to public “0000” as when your ship is cored, you won’t be able to access them otherwise!
If you get cored:
Get out of the cockpit and immediately place one down. Sometimes your enemies will place a core faster then you can, this will usually be located outside your ship. If this happens, attempt to shoot it off with a player weapon, preferably a high damage one. Assuming you gain control of the ship again, immediately retreat, as the core is no longer covered by lagshot.
If you get warpcored:
Increase speed to maximum and get as far away from the enemy as possible, then come to a complete stop. Get out of your cockpit, and, if you followed the CV guide, place your warpcore in your cockpit room. Repeat as required. At this point, I would suggest a withdrawal, as warpcores going can be a sign of extreme internal damage.
When piloting a CV, point the nose of the craft forward and try to catch as many shots from the enemy CV’s arty and plasma as possible. Arty can be spotted by its signature long white tail and plasma by it’s blue “fireball” effect.
Remember, you have a decoy turret in the nose of your CV that is going to attract all of your enemies fire. Simply keep the front of the CV pointed at the enemy, and the ship’s turrets will do the rest.
Target any spots where you can visibly see turrets with your mounted weapons, stripping the enemy of firepower. If you can’t locate any turrets, go for the most central location as this will cause internal lag-shots and damage.
Once you’ve stripped all of the enemy turrets, start digging out their generators. Eventually, you’ll kill the target’s power. While you’re doing all of this, make sure to keep checking if your warpcore and warptank is still intact. It could go out at any minute, and it’s better to see it happen then expect it to be there when you attempt an escape. You can do this by simply opening the P menu with the brake off, which will not stop your ship.
Remember not to engage a target twice your size, because CVs depend a lot on their armor, which means a 35K block CV is superior to a 25K block ship in raw durability. CV battles are usually battles of attrition where the two sides slug it out until their ships cannot take any more punishment. This takes a very long time, so you have the opportunity to learn as you go, but should you come across something twice your size, disengage immediately.
Other then that, CVs are relatively simple and safe to operate for a newer player, and so are easily one of the best ways to get into PvP. Have fun!